How to Get Accurate Canon Colors in Lightroom
Our readers often ask us if it is possible to get Lightroom to provide the same colors as one would see from camera-rendered JPEG files when shooting in RAW format. Unfortunately, as you might have noticed when importing files, Lightroom changes the colors immediately after import, when the embedded JPEG files are re-rendered using Adobe’s standard color profiles. As a result, images might appear dull, lack contrast and have completely different colors. I have heard plenty of complaints on this issue for a while now, so I decided to post series of articles for each major manufacturer on how to obtain more accurate colors in Lightroom that resemble the image preview seen on the camera LCD when an image is captured. In this article, I will talk about getting accurate colors from a Canon DSLR in Lightroom.

1) RAW File Nuances and Metadata
When shooting in RAW format, most camera settings like White Balance, Sharpness, Saturation, Lens Corrections and Color Profiles do not matter. Unless you use Canon-provided software like Digital Photo Professional, all of those custom settings are mostly discarded by third party applications, including Lightroom and Photoshop. That’s because it is hard to process each piece of proprietary data, which is subject to change from one camera model to another. Now imagine trying to do this for a number of different camera manufacturers!
Let’s go over data that is actually read by Lightroom / Photoshop Camera RAW:
White Balance, as set by the camera. Instead of your chosen value such as Auto, Incandescent, Fluorescent, etc, only the actual color temperature and tint are read from the RAW file.
Common image metadata such as Capture Date/Time, Exposure, Focal Length, Flash, Camera Make and Model, Lens information and GPS coordinates.
Copyright information (“Author’s Name” in Setup Tab 4)
That’s basically it. Now here is the information that is completely discarded:
Picture Style
Lens Aberration Correction (Peripheral illum. and Chromatic aberration)
Color Space (only relevant for JPEG images and JPEG images embedded into RAW files)
Auto Lighting Optimizer
High ISO Speed NR
Highlight Tone Priority
Focus Point Location in the frame
All other settings in Shooting, Setup, Custom Functions and other menus
All of the above settings do not affect RAW files in any way. Whatever you choose in your camera simply gets written as header information to Canon’s CR2 files. Please note that “Long exposure noise reduction” is the only setting that affects RAW files. However, Adobe will still not know if Long exposure noise reduction was turned on or off in your camera.
2) Camera Settings
Because the above settings do not affect your RAW files, they are essentially of no use, so I would recommend to keep them turned off by default. You might be wondering why the image on the back of the LCD changes when you pick different Picture Styles or other settings while shooting in RAW. That’s because RAW files actually contain full size JPEG previews, which is what your camera shows on the back of the LCD. Hence, any change you make in your camera will simply be reflected in the embedded JPEG file only. When RAW files are imported into Lightroom / Camera RAW, the embedded JPEG file is discarded and a new one is generated, based on Adobe’s default settings, or a chosen import preset. That’s why when I talk about getting more accurate Canon colors in Lightroom, we are simply trying to match Canon’s default rendering of colors in JPEG images to those rendered by Lightroom or Camera RAW. Remember, a RAW file is just like unprocessed film – you can interpret and process colors any way you like.
However, changing camera settings can indirectly affect your RAW files. For example, if you have Auto Lighting Optimizer turned on (which simply applies a tone curve to the embedded JPEG image), you might think that you have enough shadow details in your image and you might end up underexposing the image. High ISO Speed NR might make it seem like you do not have much noise in your images, so you might not notice that your ISO value is unnecessarily high. That’s why it is best to turn all custom settings off completely.
Canon has a set of Picture Styles available in its cameras. By default, a camera profile called “Standard” gets applied to images. That’s the Picture Control I typically use on all of my cameras. Whichever Picture Style you pick, I would suggest to stick to it if you want to see consistent colors in your images. And do not worry about modifying custom adjustments within picture controls, since those might also indirectly affect your RAW images as well (for example, setting high values for Contrast, Saturation and Color Tone).
3) Lightroom and Camera RAW: Camera Calibration
Since photographers want to see colors as rendered by their cameras, Adobe ended up creating different camera profiles based on the colors they saw from the rendered JPEG images. The process of creating such camera profiles is fairly complex and it involves shooting different color charts in JPEG format, then trying to match those colors while rendering RAW files. Adobe did a nice job with Canon’s color profiles and re-created all of them (excluding the “Monochrome” profile, since it is not in color and “Auto”). Here is the full list of created profiles:
Camera Faithful
Camera Landscape
Camera Neutral
Camera Portrait
Camera Standard
You can find these profiles under the “Camera Calibration” sub-module in Lightroom, or the “Camera Calibration” tab in Camera RAW, as seen below:
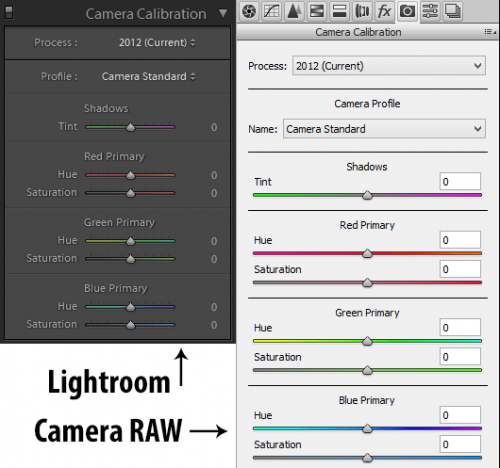
That’s why it is a good idea to stick to one Picture Style in your camera, because you can set that same Camera Calibration profile to all images every time you import them.
Adobe also provides the ability to tweak individual colors for hue and saturation after applying a profile, but if you choose to do that, it will certainly deviate from Canon’s original colors.
4) Applying a Camera Profile During Import
If you want to always have Canon’s native colors in your images and not the default “Adobe Standard” camera profile, you might want to set up an import preset that gets applied to your images when they are imported into Lightroom. This is a very simple and straightforward process, so let me show you the best way to do it.
First, open any Canon RAW / CR2 file in Lightroom’s Develop Module.
Keep White Balance under the “Basic” sub-module “As Shot”, if you want Lightroom to read what your camera set WB and Tint to.
Scroll down to the Camera Calibration sub-module.
Pick the same color profile as what you have set in your camera (for example, Camera Standard).
On the left panel, scroll down to the “Presets” sub-module and press the “+” sign next to it, which is used for creating a new preset.
A new window will pop-up. Give the preset a name, for example “Import Preset”. The default folder “User Presets” is fine, but you can create a different folder if you want to.
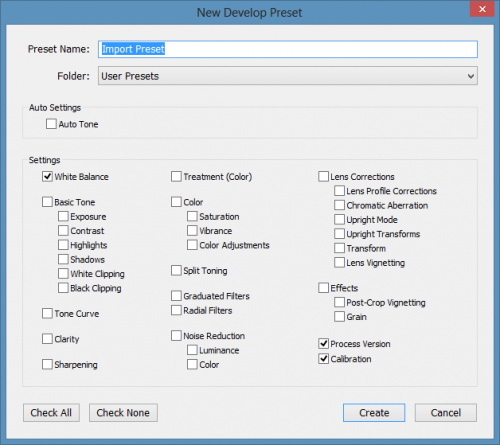
Only select “White Balance”, “Process Version” and “Calibration”, then click “Create”, as shown below:
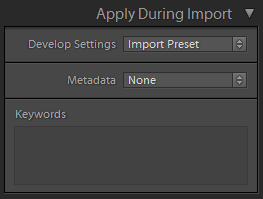


.gif)


