
.gif)


How to Whiten Teeth in Photoshop
Who wouldn’t want pearly white teeth gleaming through a beautiful smile! This is a quick and one of the most effective ways of whitening teeth in Photoshop. I’ve tried many different ways before, but once I adopted this particular method, I never went back to my old ways again.
Here is how I do it:
Open the image in Photoshop. If you are in Lightroom, simply right-click the image and click “Edit In”->”Edit in Adobe Photoshop”.
Zoom in enough to make it easy to work with teeth by pressing CTRL +.
We are going to be using the ‘Magnetic Lasso’ tool to achieve this task. It is located in the upper left corner, under the ‘Crop’ button.

Make a full circle and connect in one point.
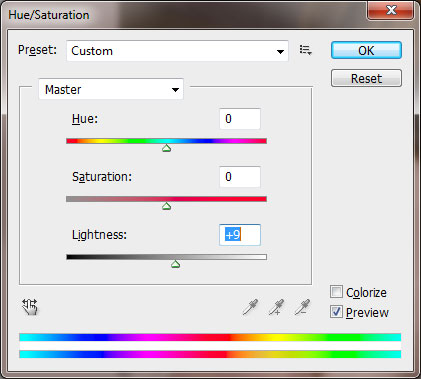
To blend the changes to teeth better, go to Select->Modify->Feather in the top menu and put “1″ pixel in the “Feather Radius” box.
To make the changes more visible to the eye, go to View and un-check Extras. This is not the same as Deselect. It will only hide the ‘Magnetic Lasso’ on the teeth.


Click OK and return to the image.
Press CTRL+D to deselect the ‘Magnetic Lasso’ area.