How to Upload Photos to Flickr and 500px using Lightroom 5

The skills you’ve learned so far in this series (yes, there is a series – I’ll provide links to the relevant articles at the appropriate points) all come together with Lightroom’s Publish Services. You can use these to publish photos to photo sharing websites like Facebook, Behance, Flickr, 500px and more. Today I’ll concentrate on the two you are most likely to use for your best images: Flickr and 500px.
How to Upload Photos to Flickr and 500px using Lightroom 5
Publishing Collections

Published Collections have one purpose only: to publish your images to either a hard drive location or a photo sharing website such as those listed above.
Published Collections are dynamic. They tell you if a photo has changed after you have published it, so you can re-publish it.
Here’s how it works. You create a Published Collection containing the photos that you would like to upload to a website (for example, Flickr). Lightroom tells you which photos have already been uploaded, and which ones haven’t. But wait, there’s more: if you publish a photo to Flickr, then make changes to that photo in Lightroom’s Develop module, Lightroom’s Publish Service marks it and gives you the option of uploading it again.
That’s clever, and very, very useful, as it enables you to see at a glance whether you have uploaded the most recent version.
Setting up a new Flickr Publish Collection
That’s the theory, let’s see how to put it into action:
Step 1. Go to the Publish Services panel. It’s at the bottom of the left-hand panels in the Library module (see below)


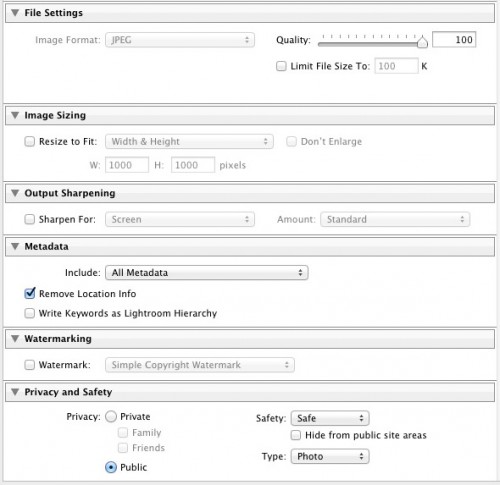
You’ll see that there is a Published Collection called Photostream in the Flickr Publish Service. Any photos you add to this Published Collection will be uploaded to your Flickr account using the size and quality settings you selected earlier.


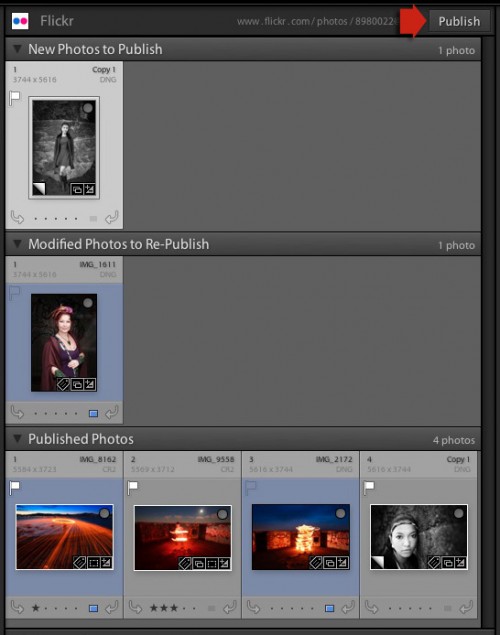
New Photos to Publish: photos added to the Published Collection but not yet uploaded to Flickr. Click the Publish button at the top right to publish them.
Modified Photos to Re-Publish: these are photos already uploaded to Flickr that have changed since being published. Note that any change, however minor, will result in a photo appearing in this section. That includes things like adding keywords, or any tweaks you make in the Develop module. Modified photos are uploaded again when you press the Publish button. If you don’t want to upload the modified photo, right-click on the thumbnail and select the Mark as Up-to-Date option.
Published Photos: Photos already published to Flickr.
You can also manage Flickr Photosets from within Lightroom. Right-click the Flickr Published Collection heading and select Create Photoset from the menu. This lets you add photos to Sets as well as your photostream.

Publishing to 500px
The 500px Publish Service works in a similar way to the Flickr Publish Service except that it is not built-in to Lightroom. You need to download the plug-in from the 500px website, which you can do here.
Unzip the file and move it to your Programs folder (PC) or Applications folder (Mac). Go to the Lightroom Plug-in Manager (File > Plug-in Manager) and click the Add button to install the plug-in. Once installed, it works virtually the same way as the Flickr Publish Service. The main difference is that the 500px plug-in downloads any photos you have already uploaded to 500px and adds them to your Lightroom Catalog.


.gif)


